Final Product- Music Video

Saturday, 19 December 2009

Photoshop- Finishing my Front and Back covers

During today's session I aimed to finish my front and back covers. After uploading my photos taken of my band and necklace, I edited them in Photoshop. For the necklace I used the 'Magic Wand Tool' to take out the background of the photo and just have the chain and pendant. I placed the finished image on the top of my back cover.
For the long shot of the band I used the 'Magic Wand Tool' to take out some background however I couldnt use it for the whole of the image so I used the 'Quick Selection Tool' and change the 'Tolerance' of the tool so I could take out smaller parts to the background. Once I just had the two members of my band I then changed the colour overlay of the image to a black to create a silhouette. I placed this silhouette in the middle of my front cover and also placed a smaller one on my back cover which I plan to change the colour overlay too as well.

Friday, 18 December 2009

Photos taken to be used on my front, back and magazine advert

For my front cover to my DVD I am planning to have a photograph of 'The Madettes' that I would edited on Photoshop- I am planning to use this long shot taken by myself of the band. When researching the Ska genre I noticed how a lot of artwork used silhouettes on the covers- so I plan to edited this photo to create a silhouette.
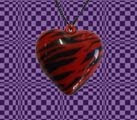
I wanted to include recognisable symbols so I then took a close up of a necklace used in the music video that I would place on the back cover of my DVD.

Thursday, 17 December 2009

Photoshop- Developing my Back cover and spine

In today's session I carried on developing my back cover and spine on Photoshop. With the background already finished, I placed the title of the DVD and my bands name on the spine, in my chosen font with contrasting colours so it was readable. I then placed the DVD logo on my spine as it was conventional to a DVD another convention I added to my DVD was an ordering number I had to make up.
Moving onto my back cover, sticking to my plan I wanted to create a Keyboard outline of keys/notes on the side of the cover which I will then place the track listings on the individual notes. Do create the Keyboard notes I had to use the 'Rectangle Tool' with a white background to create a base, then used the tool again but changed the colour to black and made the shapes smaller so they were the notes on the keyboard. With the notes made I then added in my track listings in-between each notes. I used a different font to make it more readable and create an effect that someone has personally wrote the title on. The font was different from my front cover and spine but used the same colours as the spine to keep the colour theme.


I then added conventional symbols such as my record label logo, DVD logo and compact disc logo to the bottom of my DVD back cover. I also placed a bar code at the bottom and the written information about copyright etc at the bottom too. Finally, another convention to the back cover is websites so I create an address for my bands official website and also placed the record company's website below the bands website.

I am now planning to take photos of my band and necklace used as iconography to carry on finishing my back and front cover.
Wednesday, 16 December 2009

Photoshop- Developing Front Cover, Back Cover and Spine

I will be using Photoshop on the Macs to produce my Digi-Pack- I will be producing a DVD Front and Back cover, an inside cover for my DVD and a magazine advert for my digi-pack, I may later produce additional materials using Photoshop if I have time.
During today's session I created three canvases for my front cover, back cover and spine (which I then plan to flatten and piece together in one canvas). To create my background for the DVD front and back cover I used the 'Pattern Stamp Tool' and chose a pattern that was black and white checked squares. I chose this as my research proves that this is a common convention to the Ska genre. I then used the 'Brush Tool' with a shade of purple to go over the checked squares- to make it effective I needed to change the 'Opacity' of the tool from 100% to 33%, so you could still see the checked squares. This is the background for my DVD front, back and spine, I am also planning to use this for my magazine advert and other marketing materials as a running theme in my Digi-Pack and Adverts.

Carrying on a iconography from my music video into my Digi-Pack and then added another layer to my front cover canvas and used the 'Pattern Stamp Tool' choosing a Jig-Saw piece as my stamp and placed one in each corner of my front cover- choosing the same pattern as my background. Also like my background, I used the 'Brush Tool' choosing four different colours and went over the stamp changing the opacity so you could still see the stamp- I wanted to create a spray effective and achieve this through using a brush.
I then placed the title of the DVD album at the top with my chosen font- I chose the colour yellow of the font to make the title stand out and contrast the background. Like my plan I want to have the name of my band 'The Madettes!' coming out of a trumpet- so I had to create individual text boxes and place them on the layer in a shape that conveyed the name coming out of the trumpet. I chose to have this in orange font as it worked well with the yellow title and also contrasted the background of purple.

Tuesday, 15 December 2009

Research into similar marketing ideas and represenation for bands/artists

While researching into the Ska genre I researched into a modern Ska band and artist relevant to the music industry at the moment. 'No Doubt' were very significant to the Ska genre movement as they brought the genre of Pop into Ska and to a mainstream modern audience. I also looked into the marketing for the main singer of No Doubt who is a solo artist herself- Gwen Stefani.

I want to merge the Pop genre with the Ska/2Tone genre for my band 'The Madettes' and feel that the marketing ideas behind these acts are extremely successful and I want to echo the success with my band.

DVD Inside Cover- Planning


This is my uploading of my inside cover of my DVD, I have continued to use checked squares and bright colours for the inside cover. I am planning to insert still shots into the left hand side of the DVD cover to continue to market my music video throughout the marketing package. Symbols and iconography related to my band will also be used in the inside of my cover.

DVD Cover and DVD Back Cover- Planning


This is my uploading of my plan for my back and front cover of my DVD. I have decided to conform and challenge my genres conventions when planning my DVD cover and back cover. I have used the running theme of checked squares throughout my marketing package and decided to use colour to bring the genre up to date and to a modern audience. I have used musical instruments on my cover and a piano outline on the back cover to show the musical side to my band. I have used iconography from my music video such as jug-saw pieces and the love heart used on the back cover- to continue my running themes and to give the audience a sense of familiarity with the music video and DVD. I have followed classic conventions to a DVD with the logo, information and so on.