
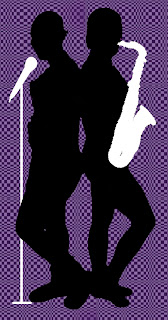
In this session I finished a draft of my DVD front and back cover. After creating a black silhouette on my front cover I used a downloadable brushes that were in the public domain to add final touches to my front cover. I downloaded musical instruments in the brushes set- I then used the 'Brush Tool' and chose the saxophone brush with a white tolerance of 50 and placed a couple over each other- so it produced a white silhouette of a sax. I then positioned the saxophone in the right place so my band's name looked like it was coming out of the sax. I then used the brush tool again and found a microphone brush- I changed the tolerance to 50 with a white colour to it- again looking like it was a silhouette of a mic. To create a mic stand I used the brush tool and used an appropriate size to create the stand. I then position the mic and stand together merging them and placing them next to Sheriece so it looked like she would be singing out of it.
To finish of my back cover I used the same silhouette of my band I used on the front cover by changed the colour overlay of it to a pink. I then wanted to make Sheriece a different colour so I Duplicated the layer and changed the colour overlay to orange. I then used the Eraser tool to rub out Stacey on this layer so final I got Sheriece in a orange silhouette and Stacey in a pink one together.
Lots of very detailed evaluation here- well done.JIN
ReplyDeleteCan you get some evaluative comments from a sample of your target audience? How successful were you?JIN
ReplyDelete